
How To Create And verify Adsterra Account
Today we are going to talk about Adsterra What is Adsterra and how we can create an account on Adsterra and verify it.
What is Adsterra ?
This article is very important for those who have a website or blog, No matter if you have a website on blogger or WordPress. You can earn from day 1 by putting your Adsterra account on it. Google AdSense has an alternative. People who are worried about their blog or website and wait for their approval for months and years, and they don’t get approval from AdSense and their website doesn’t start earning.
Best option is from Day 1. You made an account on Adsterra Sign up Put your website in it, You will get ready made ads from there You will come to your website immediately start putting ads there. And as soon as visitors come to your website They will see the ads And your earnings will start from Day 1. Again, I am telling you that Adsterra
The best alternative is AdSense, where you can easily generate traffic to your website and start your online earnings.
It’s very easy. And here you have to click on the first link you see here. Adsterra.com
So what should you do for this Adsterra?
Here you can see Adsterra.com, this website will open in front of you. You can see all their terms and conditions, but we will come directly to the topic. Here you can see the sign-up button, click in the top right corner. As soon as you click on it, the next window will show in front of you, on which we will do all the work. Here is a very important step, you will have three options as an advertiser. That is, if you want to give ads, then you will select these options.
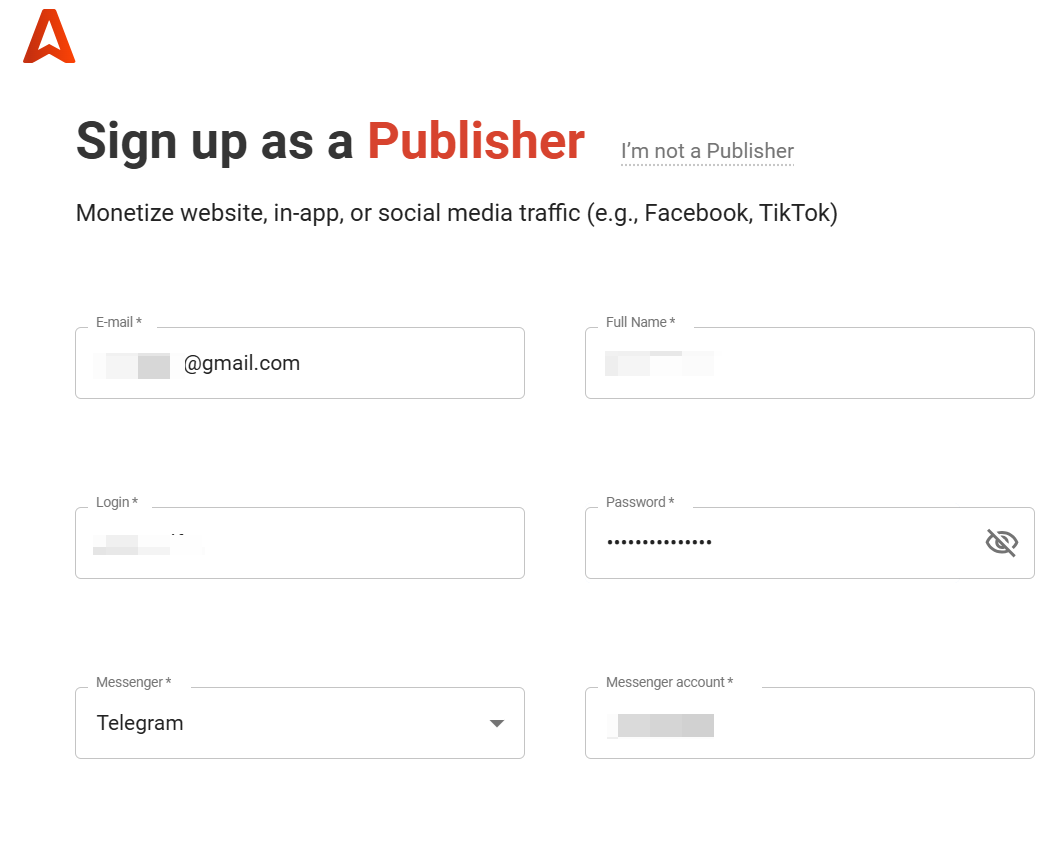
- As a Publisher
- As an Advertiser
- As an Affiliate
So we will click on as a publisher, and we will create our account because we want to monetize our website traffic and earn online from it. You have to click on get started, and the next window will open in front of you. Sign up as a publisher.


Register For Adsterra
Here you have to give your email address, full name, login username, password, select your messenger, let me tell you everything. First of all, You also type your Gmail address here and next your option will be your full name. You have to put the full name on your ID card. Because sometimes they verify your ID card, so you have to put your proper name on your ID card or your passport.
I have created my username here, to see if it is available or not if it is available, then you have to select then your password. To select a password, you have to write the first word capital. With the capital letter, you have to write small words, put a sign, and you have to write digits. Then your password will be accepted.

What is it saying?
It is saying that you can put your Facebook, Skype, Telegram, Instagram ID here. I will put my Instagram account here. You can also put your Instagram, Facebook or any social media account here. Which is acceptable here. After that, you have to like payment methods. There are a lot of payment methods here.
I will select the bank transfer, and you can change it later. After clicking on this, you have to checkmark on the terms and conditions and simply click on the sign-up button. As you click on the sign-up button, it will quickly send you an email.
They have sent a confirmation email. You have to click on this. You will click on this, and you will be redirected directly to the confirmation page. You see, the verification code of ads has been successfully confirmed. You still don’t have to close this window. It will automatically redirect you to the login page.
Given my password and username automatically, but if you don’t get it, then you can put the username and password that you just chose in it and click on the login button. This is how much it is useful. Quickly, your account is created. You can see that your account is created and verified.


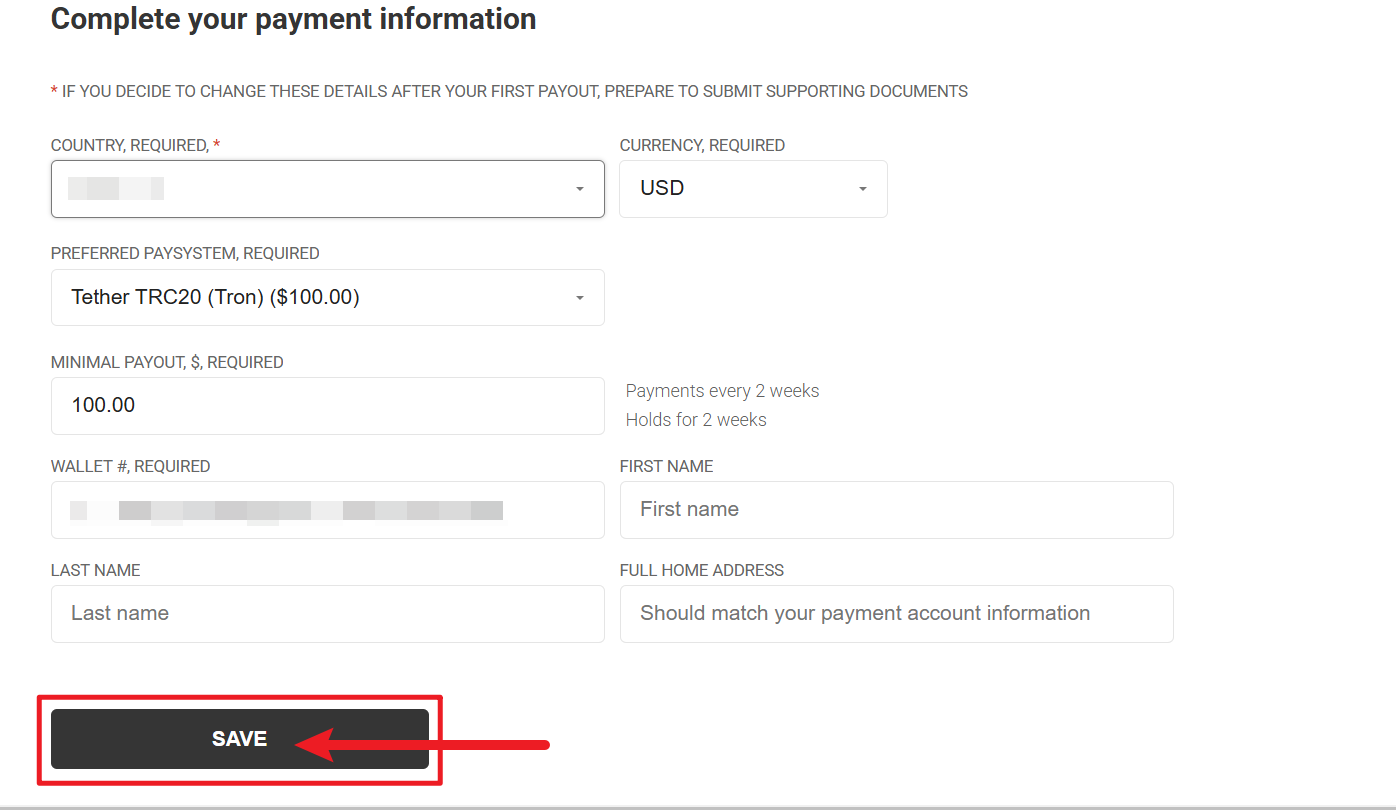
Create Your Payment Methods
Come to your top right corner, here you will see your profile option, you have to click on your profile and open your profile. And you have to add the settings that are left in it.
Select your country, You have multiple options in the payment You have to see which is feasible for you From where you can withdraw your payment You can choose local bank transfer because it has a $100 threshold. When you have $100, it will be transferred to your local bank. It will take 1–3 days. But the best option is to select bitcoin or USDT.
The reason is that the wallet of cryptocurrency is the fastest. You click on it quickly, enter your web address, country address, and you get this money immediately. So the best option is to select Bitcoin or USDT. Go to your Binance wallet and copy its address from there and put it here. And your payment will be transferred quickly from here.
You can withdraw it twice a month. So I am going to select Bitcoin in my payment method because I find it more feasible. You can choose any of them as you wish.

How easy is this?
Here you can see that my profile has been completed. My Adsterra account has also been signed up and created. After that, I have also verified it. And after that, I have also selected my payment method.
This article is now complete. I have told you the whole process in this article. In the next article, I will tell you how to create an ad from here, how to put it on your blog’s website and how to start earning. You don’t miss the next article, and you can start your all-in earning journey. That’s for the today.